
This dialog lets you add or edit an object to be included in the installation package.
Distributing a folder
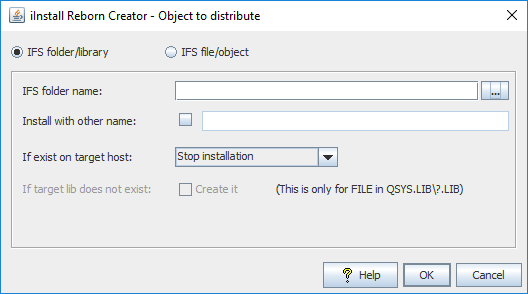
Select the ‘IFS folder/folder’ option:
Click on the button ‘…’ to browse the IFS of the IBM i, iSeries, AS/400:
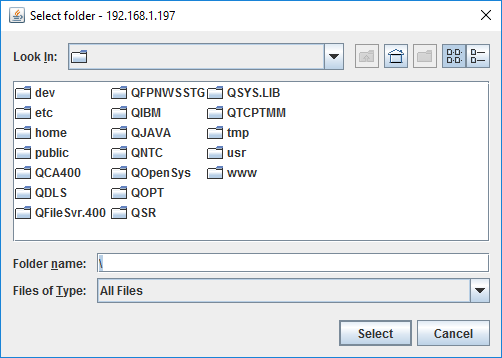
Select the folder you wish to distribute and click on the button ‘Select’.
On the ‘IFS folder/library’ panel you have the following options:
- Install with other name
When you check this box, the field to the right opens up. Enter the folder name to use as restore name.
If you are distributing a IFS folder, then this name is the last name in the path. E.g. if the folder you want to distribute is (on your IBM i):/ordersystem/templates/invoices
the name you enter is the name to use for ‘invoices’ when restoring.
It is required that the parent levels of the path exist on the target host, no matter if you want to use another name during the installation.
If you enter ‘customer_invoices’ into the field, then iInstall Reborn Installer will try to restore that folder as:
/ordersystem/templates/customer_invoices
- If exist on target host
If the folder exists on the target host, what should iInstall Reborn Installer do. The three options are:- Stop installation
iInstall Reborn Installer stops the installation process. This can result in a manual cleanup is needed as already installed folders/objects are not ‘rolled back’. - Change install name
iInstall Reborn Installer will display a message to the user, stating that the folder already exists and the user can enter another name to restore the folder as. - Overwrite existing folder
iInstall Reborn Installer will display a message to the user, stating that the folder exists and it will be overwritten. The user can cancel the installation process. If the user accepts the folder will be overwritten, data from the existing folder is lost.
- Stop installation
- If target lib does not exist, create it
When you select, or enter the name of a file in a HFS library, this checkbox will be enabled. It allows that the library will be created if it does not exist.
This video shows how you distribute a library:
Distribute a IFS file or object
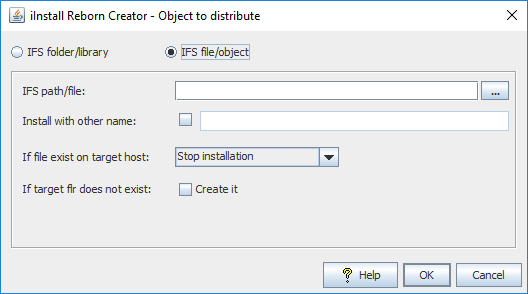
Select the ‘IFS file/object’ option:
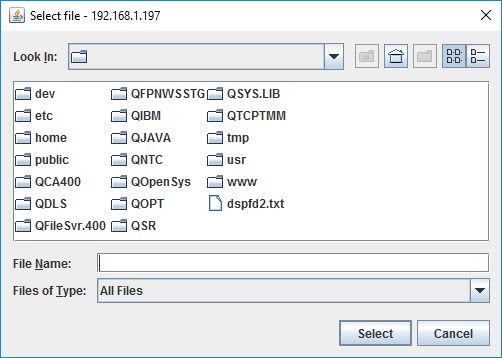
Click on the button ‘…’ to browse the IFS of the IBM i, iSeries, AS/400:
On the ‘IFS file/object’ panel you have the following options:
- Install with other name
When you check this box, the field to the right opens up. Enter the folder name to use as the target folder for the file/object.
If you are distributing an object from an IFS folder, then this name is the last name in the path. E.g. if the file you want to distribute is (on your IBM i):/ordersystem/templates/invoices/template41.xml
the name you enter is the name to use for ‘invoices’ when restoring.
It is required that the parent levels of the path exist on the target host, no matter if you want to use another name during the installation.
If you enter ‘customer_invoices’ into the field, then iInstall Reborn Installer will try to restore the object as:
/ordersystem/templates/customer_invoices/template41.xml
- If exist on target host
If the object exists on the target host, what should iInstall Reborn Installer do. The three options are:- Stop installation
iInstall Reborn Installer stops the installation process. This can result in a manual cleanup is needed as already installed folders/objects are not ‘rolled back’. - Change install name
iInstall Reborn Installer will display a message to the user, stating that the object already exists in the folder and the user can enter another folder name to restore the file/object into. - Overwrite existing file/object
iInstall Reborn Installer will display a message to the user, stating that the file/object exists and it will be overwritten. The user can cancel the installation process. If the user accepts the file/object will be overwritten. The existing file/object is lost.
- Stop installation
- If target folder does not exist, create it
If the target folder does not exist, it will be created. If the folder is a sub folder in the IFS, all parent folders must exist.For folders (libraries) in QSYS.LIB, the parent will always exist.If you have selected ‘Change install name’ in ‘If file/object exists on target host’, then if the user enters a folder name that does not exist, the folder is created. If the folder is in fact a library, the text for the library will be set to ‘Created by iInstall Reborn Installer’.
Browsing for objects in the HFS (Hierarchical File System)
iInstall Reborn uses the toolbox JT400 from IBM (r) to communicate with the IBM i. Because of this, objects are found through the IFS. To find libraries and objects in libraries is different from using, e.g., PDM. You must go through the folder QSYS.LIB to find libraries and objects in libraries.
Because libraries and objects are found/seen though the IFS, there are some special cases when you want to select certain objects. In geneal, if you want to distribute an entire library, select the ‘IFS folder’ option, browse into QSYS.LIB. Here you will find the libraries on the IBM i. Select the one you want to distribute and click on the button ‘Select’. If you want to distribute an object from a library, select the ‘IFS file/object’ option and browse into QSYS.LIB and then find the library in question and browse into that.
The special cases are:
- Distribute a file with all it’s members.
Seen from the IFS’s point of view, a file is a folder. Because of this, you must select the ‘IFS folder’ option, and then browse into the library where the file exists. Select the file by clicking on the file and then click on the button ‘Select’. - Distribute one member from a file.
You would take this option if you want to distribute a source member. Select the option ‘IFS file/object’, and then browse into the library where the file exists. Then double click on the file. All the members are now displayed. Select the member in question, and click on the button ‘Select’.